Jira Integration
This integration requires a paid plan. Please see our pricing page for further details.
The Unflakable Jira integration automatically creates Jira issues in response to events such as tests becoming or . The specific events that trigger new Jira issues can be customized as part of the Jira workflow, along with the option to resolve Jira issues automatically when tests transition to . After Unflakable creates a Jira issue, it will add comments to the Jira issue whenever the corresponding test's status changes, until the issue is resolved in Jira.
This page covers the following topics:
- Unflakable Jira app
- Adding a Jira integration
- Updating Jira site, project, issue type, or issue fields
- Jira workflow
Unflakable Jira app
To get started using the Unflakable Jira integration, install the Unflakable Jira app from the Atlassian Marketplace. The Jira app establishes a connection between your Jira site and Unflakable, including the secure credentials needed for Unflakable to communicate with Jira.
The Unflakable Jira integration is compatible with Jira Software Cloud only. It is not compatible with the self-hosted Jira Server or Jira Data Center products.
After installing the app, click Get started on the Unflakable app within Jira's Universal Plugin Manager. This will open the Linked Teams page:
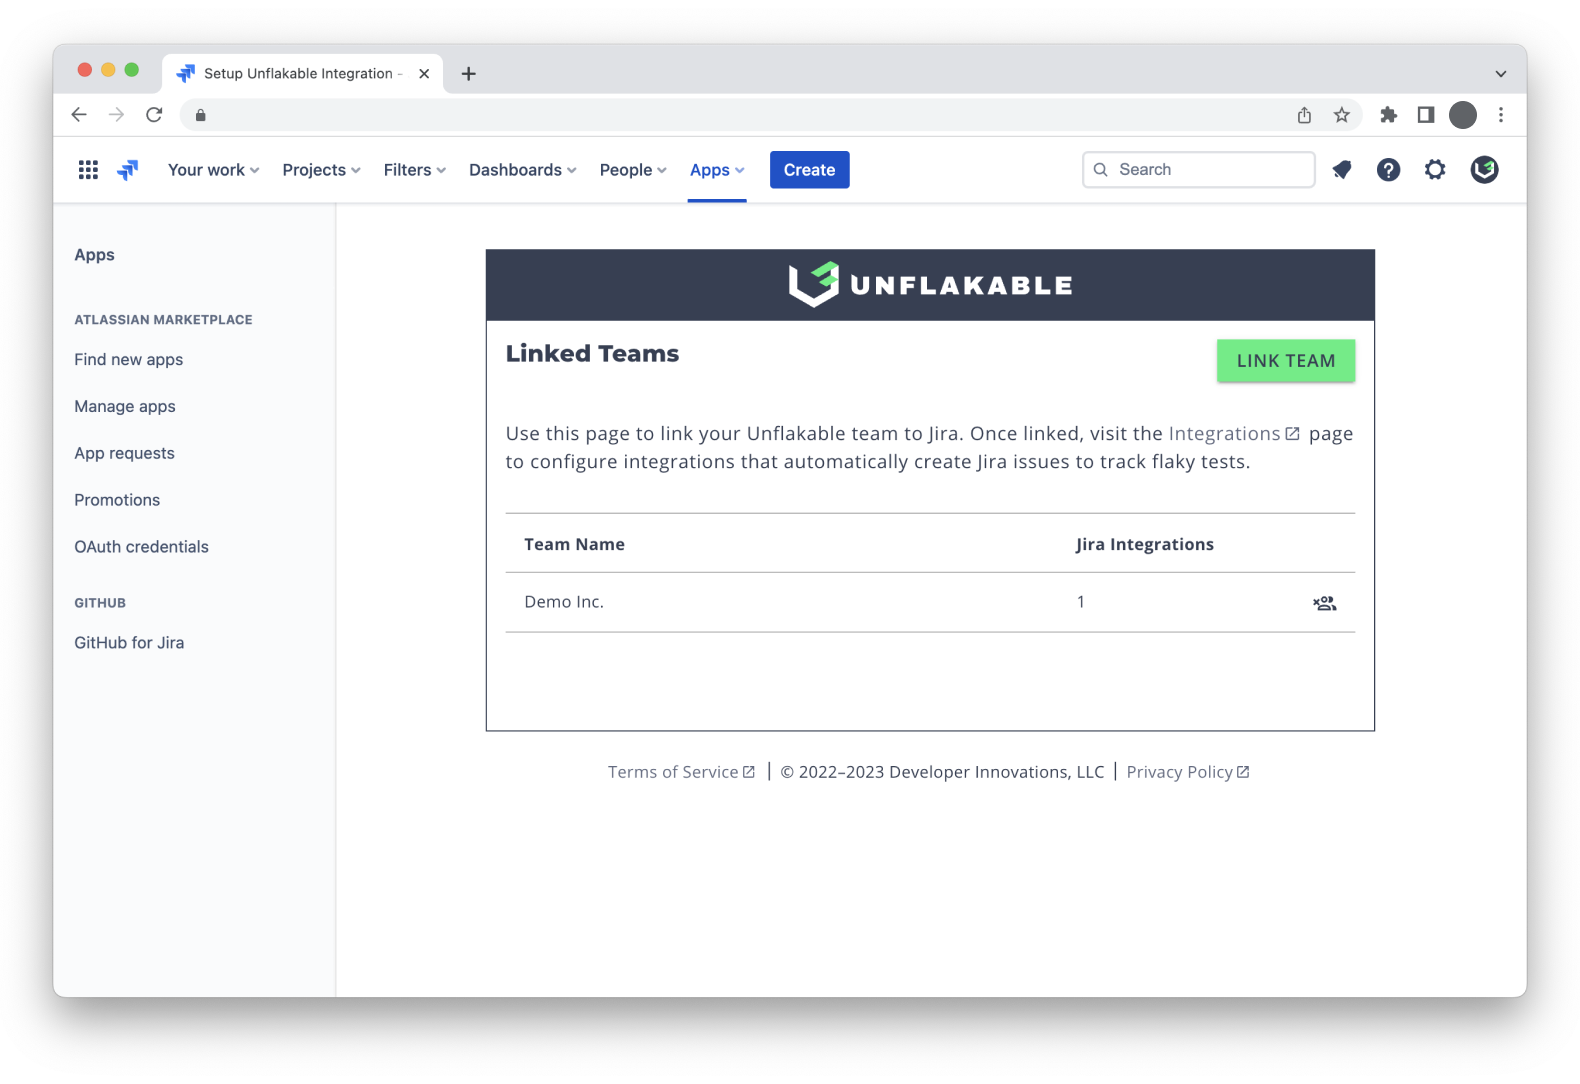
Linking an Unflakable team to Jira
To link your Unflakable team to Jira:
- Install the Unflakable Jira app if it is not already installed.
- Click LINK TEAM. This will open Unflakable in a new window or tab. If Unflakable does not open, be sure your browser or popup blocker permits the popup and try again.
- If you are not already signed in to Unflakable, a Sign In prompt will be shown. Enter your credentials to sign in.
- A Link Jira Site confirmation dialog should appear. Click LINK JIRA SITE to confirm that you would like to link your Unflakable team to the Jira site shown.
- Return to the Jira app window or tab. Your Unflakable team should now be listed as a linked team.
Unlinking an Unflakable team from Jira
Unlinking an Unflakable team from Jira will prevent the team from creating any Jira integrations that use your Jira site. Any existing Jira integrations that use the Jira site will be disabled and cannot be re-enabled until the Jira site is re-linked or the integration is configured to use a different Jira site.
To unlink an Unflakable team from Jira:
- Open the Get started page for the Unflakable app within Jira's Universal Plugin Manager.
- Click the Unlink ( ) icon in the row corresponding to the team you wish to unlink. A confirmation dialog will appear.
- Click UNLINK to confirm.
Uninstalling the Unflakable Jira app
Uninstalling the Unflakable Jira app will revoke Unflakable's credentials for accessing your Jira site and prevent all linked teams from creating any Jira integrations that use your Jira site. Any existing Jira integrations that use the Jira site will be disabled and cannot be re-enabled until the Unflakable Jira app is reinstalled or the integration is configured to use a different Jira site.
To uninstall the Unflakable Jira app, click Uninstall within Jira's Universal Plugin Manager.
Adding a Jira integration
A team can have a maximum of 20 integrations.
Before adding a Jira integration, be sure that the Unflakable Jira app is installed and linked to your team.
To add a Jira integration:
-
Visit the Integrations page.
-
Click the Add Integration button labeled with a plus sign (+).
-
Select Jira as the integration type.
-
Provide a name for the integration (e.g.,
File a Jira bug). -
Select a Jira site from the drop-down menu. If the desired Jira site is not listed, be sure it is installed and linked to your team. If you recently linked your team to Jira, refresh the page and start again. After selecting a Jira site, the Jira Project field will appear.
-
Select a Jira project from the drop-down menu. The Jira Issue Type field will appear.
-
Select a Jira issue type (e.g., Task or Bug) from the drop-down menu. The available Jira issue fields for the selected Jira project and issue type will appear.
-
Specify values for any Jira issue fields that you would like Unflakable to populate when creating new Jira issues.
The fields and options that appear are determined automatically based on the configuration within Jira. Fields marked with an asterisk (*) are required. Unflakable currently supports custom Jira fields that are checkboxes, select lists, or short text fields.
-
Optionally click the CREATE JIRA ISSUE button to create an example Jira issue with the configuration options chosen above.
-
If you have previously added test suites, you may enable this integration for one or more of them by checking the boxes next to the corresponding test suites.
-
Click ADD to create the integration.
-
Optionally customize the Jira workflow by following the instructions below.
Updating Jira site, project, issue type, or issue fields
To update the Jira site, project, issue type, or issue fields that Unflakable populates when creating new Jira issues:
-
Visit the Integrations page.
-
Expand the Issue Configuration panel for the corresponding Jira integration if it is not already expanded.
-
Click the Edit Issue Configuration ( ) icon in the upper-right corner of the Issue Configuration panel.
-
Update the desired Jira site, project, issue type, and issue fields as desired. Please note that updating the Jira site, project, or issue type will clear each of the subsequent fields, which depend on the earlier selections.
The fields and options that appear are determined automatically based on the configuration within Jira. Fields marked with an asterisk (*) are required. Unflakable currently supports custom Jira fields that are checkboxes, select lists, or short text fields.
-
Optionally click the CREATE JIRA ISSUE button to create an example Jira issue with the configuration options chosen above.
-
Click UPDATE to update the Jira integration.
Jira workflow
Jira actions triggered by automated events (e.g., tests failing) only occur when tests run on stable branches. This behavior avoids creating unnecessary Jira issues for expected events such as test failures during a pull request or code review workflow.
Configuring when Jira issues are created
To configure the events for which Unflakable creates new Jira issues:
- Visit the Integrations page.
- Expand the Workflow panel for the corresponding Jira integration if it is not already expanded. Events that create Jira issues are listed under Create a Jira issue (on a stable branch) when…. If a workflow event is enabled, the toggle switch to the right of its name will appear green and positioned to the right (). Otherwise, it will appear gray and positioned to the left ().
- Click a switch to enable or disable the corresponding workflow event.
A green checkmark will appear once the update is successful. The following workflow events are
supported:
- Test becomes :
Triggered when a or test exhibits flakiness (fails, then passes upon retry) when auto-quarantine is disabled. - Test becomes :
Triggered when a team member manually quarantines a test or when a or test exhibits flakiness (fails, then passes upon retry) when auto-quarantine is enabled. - test fails:
Triggered when a test transitions to .
- Test becomes :
Please note that Unflakable will comment on existing, unresolved Jira issues whenever the corresponding test's status changes in Unflakable, even if the Jira integration is not configured to create new issues for the status change.
Configuring whether to reopen existing Jira issues
If Unflakable has previously created a Jira issue for a test and that issue has been resolved in Jira (e.g., its status transitions to Done), Unflakable can optionally reopen the existing issue rather than create a new one. By default, Unflakable will create a new Jira issue. If for any reason Unflakable fails to reopen an existing issue, it will create a new one instead.
To configure whether to reopen existing Jira issues or create new ones:
-
Visit the Integrations page.
-
Expand the Workflow panel for the corresponding Jira integration if it is not already expanded. The current behavior is shown next to If resolved issue already exists….
-
Click the Update Existing Issue Workflow ( ) icon to the right of If resolved issue already exists…. The Update Jira Issue Workflow dialog will appear.
-
Click the radio button for the desired behavior. When choosing Reopen to status, the Jira Issue Status drop-down menu will become enabled. Choose the Jira status to use for reopened issues (e.g., To Do).
Each Jira project and issue type has a corresponding workflow in Jira that defines the supported issue statuses and transitions.
-
For company-managed Jira projects (formerly called classic projects), the Unflakable Jira integration supports issue statuses that have category new (e.g., To Do) and for which the issue workflow allows transitions from all resolved (category done) statuses. This ensures that Unflakable can always reopen the issue, regardless of its current status.
If you do not see the desired issue status in the Reopen to status drop-down menu, check that the Jira workflow supports transitions from all resolved statuses.
-
For team-managed Jira projects (formerly called next-gen projects), Unflakable cannot automatically determine the transitions supported by the issue workflow (see JRACLOUD-80580). Be sure to choose a status for which transitions exist from all resolved statuses or Unflakable may be unable to reopen issues.
-
-
Click UPDATE to update the Jira integration.
Configuring whether to resolve issues automatically
When a test status changes to (either manually from or , or automatically from ), Unflakable can optionally resolve the associated Jira issue automatically. By default, Unflakable will comment on Jira issues whenever the associated test status changes, but it will not resolve them.
To configure whether to resolve Jira issues automatically:
-
Visit the Integrations page.
-
Expand the Workflow panel for the corresponding Jira integration if it is not already expanded. The current behavior is shown next to When test transitions to ….
-
Click the Update Issue Resolution ( ) icon to the right of When test transitions to …. The Update Jira Issue Workflow dialog will appear.
-
Click the radio button for the desired behavior. When choosing Resolve to status, the Jira Issue Status drop-down menu will become enabled. Choose the Jira status to use for resolving issues (e.g., Done).
Each Jira project and issue type has a corresponding workflow in Jira that defines the supported issue statuses and transitions.
-
For company-managed Jira projects (formerly called classic projects), the Unflakable Jira integration supports resolved issue statuses (e.g., Done) for which the issue workflow allows transitions from all non-resolved statuses. This ensures that Unflakable can always resolve the issue, regardless of its current status.
If you do not see the desired issue status in the Resolve to status drop-down menu, check that the Jira workflow supports transitions from all non-resolved statuses.
-
For team-managed Jira projects (formerly called next-gen projects), Unflakable cannot automatically determine the transitions supported by the issue workflow (see JRACLOUD-80580). Be sure to choose a status for which transitions exist from all non-resolved statuses or Unflakable may be unable to resolve issues.
-
-
Click UPDATE to update the Jira integration.